Like Tetris players optimizing every square inch, I’ve found that small open-plan kitchens demand strategic design choices, not luck. The challenge isn’t fitting everything in; it’s making the space feel deliberate rather than cramped.
Nine specific techniques can improve your compact layout, but one decision shapes everything else. Let me show you which approach works best for your situation.
Choose the Right Layout for Your Small Open-Plan Kitchen

How you arrange your kitchen cabinets and appliances fundamentally shapes whether your open-plan space will feel cramped or flowing. Selecting the right layout determines both efficiency and visual comfort in shared areas.
A One-Wall Kitchen maximizes openness by consolidating cabinetry along a single surface, ideal when square footage is minimal. An L-Shaped configuration increases counter space while maintaining sightlines toward your living room. For narrower spaces, a Galley Kitchen with a central walkway preserves light and movement without sacrificing functionality.
Peninsula layouts add counter space and create subtle boundaries between zones. Corner kitchens free valuable wall space for windows or furniture, reducing visual clutter. Each layout offers distinct advantages depending on your room’s dimensions and traffic patterns. The key lies in matching the configuration to your specific spatial constraints and daily workflow needs.
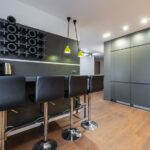
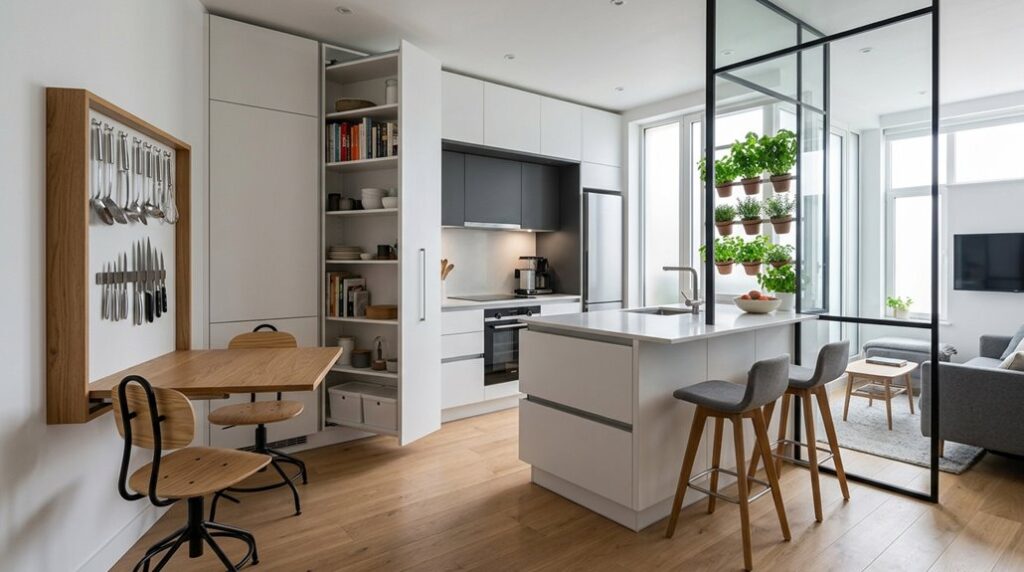
Use a Slim Kitchen Island to Separate Zones Without Blocking Flow

A slim kitchen island works best when you design it with narrow proportions, typically 24 to 30 inches wide, that create a visual and functional boundary between your kitchen and living spaces while maintaining clear sightlines and unobstructed walkways on all sides. You’ll want to incorporate tuck-under seating with low-profile stools and shallow drawers or open shelving beneath the countertop, which keeps the island from feeling bulky while still offering prep space and storage without consuming extra floor area.
Light finishes, minimal upper cabinetry, and integrated under-cabinet lighting make the island recede visually, anchoring your kitchen zones without compromising the openness that makes small open-plan layouts feel larger.
Slim Island Design Principles
When you’re working with a compact open-plan kitchen and living area, why settle for cramped quarters or wide-open chaos? A slim island bridges this gap perfectly. I recommend designing yours with these core principles: maintain 36 inches of clearance on all sides for unobstructed circulation, incorporate contrast through materials, perhaps a lighter quartz countertop paired with a darker base, and integrate storage strategically beneath the surface rather than above it.
| Design Element | Purpose | Material | Dimension |
|---|---|---|---|
| Countertop | Work surface | Quartz or wood | 24″ deep |
| Base | Visual anchor | Painted plywood | 36-42″ height |
| Storage | Functionality | Drawers/shelves | 12-18″ width |
| Clearance | Flow | Open space | 36″ minimum |
This approach defines your zones while preserving sightlines and maintaining the open-plan aesthetic you’re seeking.
Traffic Flow and Clearance
The difference between a cramped kitchen and one that feels well-planned comes down to thoughtful island placement and dimensions. I’ve found that strategic positioning prevents bottlenecks while maintaining open space throughout your layout.
Consider these clearance essentials:
- Maintain 36 inches minimum on all sides of your island to allow unobstructed traffic flow
- Position the island away from primary circulation paths connecting sink, stove, fridge, and seating areas
- Verify sightlines remain clear from the kitchen into adjacent living zones
A slim, linear profile accomplishes dual purposes: it separates functional zones without creating visual barriers. Handleless fronts further minimize bulk, preserving that crucial sense of openness.
When your island doesn’t obstruct movement patterns, you’ve achieved the balance between definition and flow that makes small open-plan spaces feel carefully designed rather than cramped.
Storage and Seating Solutions
How can you maximize both storage and seating in a small open-plan kitchen without sacrificing the flow you’ve worked to establish? A slim island bridges this challenge effectively. I’d recommend incorporating drawers and shelves below the countertop to capture valuable storage without consuming floor space. This approach lets you store cookware, linens, and small appliances vertically within the island’s footprint.
For seating, narrow stools that tuck completely underneath preserve pathways when not in use. Align the island’s finish, whether white lacquer, natural wood, or matte black, with your existing cabinetry to maintain visual consistency throughout your space. Maintain at least 36 inches of clearance on all sides. This dual-purpose solution creates a defined layout by establishing zones while keeping your kitchen functional and accessible for everyone.
Position Your Sofa as a Natural Boundary Between Spaces
Why settle for walls when you’ve got furniture? A strategically positioned sofa creates a boundary that preserves sightlines into your living area while maintaining the open-plan aesthetic you’re cultivating. Placing your sofa perpendicular to the main kitchen run acts as a natural divider, establishing distinct zones without permanent construction.
Consider these placement strategies:
- Position the sofa’s back facing the kitchen to reinforce spatial separation
- Maintain 36–42 inches of clearance on all sides for functional walkways
- Anchor the arrangement with a coordinating rug to define the living zone
Selecting a low-profile sofa preserves visual openness, preventing the space from feeling cramped. This furniture-forward approach lets you claim your territory while keeping your layout adaptable and welcoming to movement throughout the shared environment.
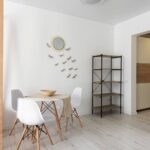
Ground Your Living Area With a Purposeful Area Rug

Where does an open-plan space actually begin and end? An area rug answers that question by visually grounding your living zone. I’d recommend selecting a rug that extends 6–8 inches beyond your sofa and coffee table, creating a unified boundary without overwhelming your open-plan layout.
Choose a low-pile or flat-weave option. These materials maintain safe underfoot movement while preventing tripping hazards in compact areas. Make sure the rug’s dimensions fully accommodate your main seating pieces, anchoring furniture and establishing clear spatial definition.
A neutral palette or subtle pattern complements existing kitchen finishes, enhancing visual flow between zones. This approach delineates separate functional areas while preserving the spacious feel your open-plan design intended.
Keep Walkways Clear With Intentional Furniture Placement
When you’re working with limited square footage, every inch of circulation matters. Intentional furniture placement becomes your most practical design tool. I maintain clear walkways by positioning pieces strategically rather than pushing everything against walls, which paradoxically shrinks the space visually.
Consider these placement strategies:
- Position dining seating diagonally along walls to preserve the central corridor connecting kitchen to living zones
- Maintain 42 inches of clearance around a slim peninsula or island, allowing unobstructed access to appliances
- Cluster occasional tables and sofas to define zones without interrupting the 36-inch minimum clearance for main traffic routes
When furniture placement respects sightlines and movement patterns, your compact kitchen-living room feels larger. This approach makes circulation your design’s foundation, creating a functional space for everyone who inhabits it.
Use Separate Ceiling Lights to Define Each Zone

How do you signal distinct functional zones without erecting walls? Strategic lighting zoning accomplishes this elegantly. I install recessed ceiling lights over the kitchen workspace, then position a separate fixture or wall-mounted lights above the living area. This separation creates clear boundaries while maintaining visual openness.
Directional spotlights or track lighting emphasizes kitchen task areas with cooler color temperatures around 4000K, strengthening focus. Meanwhile, warmer ambient lighting at 2700K in the living zone signals relaxation and comfort.
I position fixtures deliberately away from sightlines between zones, preserving the open-plan feel while distinctly delineating functions. Strategically placed lights also guide traffic patterns between spaces, enhancing the perception of defined yet interconnected areas. This layered approach creates distinct zones through intelligent illumination alone.
Maximize Storage With Tall Cabinets and Vertical Solutions
Because floor space is precious in small open-plan kitchens, I’ve found that vertical cabinetry, extending from countertop to ceiling, makes better use of wall real estate to create substantial storage without consuming the walkways and sightlines that keep the space feeling open. Tall cabinets and vertical storage solutions work best when strategically positioned along your kitchen layout.
- Pull-out pantry systems maximize narrow wall gaps while keeping frequently used items accessible without protruding into living areas
- Integrated toe-kick drawers within tall cabinets conceal bulkier items beneath countertops, maintaining a streamlined aesthetic
- Slim organizer towers positioned in corners store spices, trays, and small appliances efficiently
Aligning these solutions with your workflow, prep, cooking, and cleaning zones reduces clutter and keeps everything within arm’s reach. This preserves the openness your space demands.
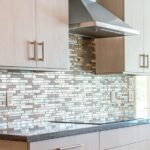
Place Your Kitchen on an Exterior Wall for Natural Light
Positioning your kitchen on an exterior wall allows natural light to flow through your open-plan space. Strategic window placement becomes your most powerful design tool for brightening both cooking and living zones simultaneously.
Consider how tall cabinets interact with your windows. Positioning them to the sides rather than directly beneath sills preserves those critical daylight paths, while lower 36-inch base cabinets under windows maintain your workflow without sacrificing sightlines.
This approach particularly benefits small homes, where reflected and distributed natural light creates an illusion of expanded square footage across your combined kitchen-living area.
Natural Light Flow Benefits
Why do so many designers prioritize placing kitchens along exterior walls? The answer lies in daylight penetration and its effect on compact spaces. When you position your exterior-wall kitchen near windows, natural light floods your cooking zone and spills into adjoining living areas, instantly brightening the entire open-plan layout.
Consider these key benefits:
- Reduced artificial lighting needs during daylight hours, lowering energy consumption
- Enhanced spaciousness through light reflecting across surfaces and pale finishes
- Lower cabinets positioned beneath windows, maintaining functionality while preserving counter-level illumination
Strategic window placement paired with light-colored materials, such as white subway tile or pale maple cabinetry, maximizes how daylight travels through your space. This approach creates visual connection between kitchen and living zones without requiring structural changes, making it an accessible solution for small footprints.
Strategic Window Placement Matters
How do you create a cramped kitchen-living area with plenty of natural light? Strategic window placement reshapes everything. I’d position your kitchen on an exterior wall, a decision that fundamentally improves your open-plan layout’s brightness.
Natural light flowing from kitchen windows into the living zone creates perceived spaciousness. You’ll notice how daylight penetrates deeper when unobstructed by cabinetry. Install lower cabinets beneath windows; they preserve functionality while maintaining clear sightlines.
Position tall storage units away from light paths, allowing illumination to travel freely across your space. Choose light-colored surfaces, white or soft gray finishes, and minimize upper cabinetry. Reflected natural light multiplies across pale walls and countertops, multiplying your room’s apparent size. This strategic approach makes window placement a practical space-maximizing solution rather than merely an aesthetic choice.
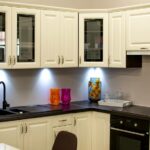
Use Neutral Tones and Handleless Cabinets to Stay Calm

A calm, expansive kitchen-living room starts with color restraint. I’ve found that neutral tones—beiges, creams, and soft grays—create visual continuity across your open-plan space without introducing competing focal points that fragment attention.
Handleless cabinets eliminate visual interruption. They maintain sleek, unbroken lines that minimize clutter perception and enhance perceived openness. Paired with neutral finishes, they establish uninterrupted flow between cooking and living zones.
Handleless cabinets maintain sleek, unbroken lines that enhance perceived openness and establish uninterrupted flow between zones.
Here’s how to maximize this approach:
- Apply lighter finishes to upper cabinets and countertops to bounce natural light throughout your compact footprint
- Choose handleless cabinet fronts to reduce visual weight and maintain clean sightlines
- Incorporate hidden organizers and pull-out drawers to keep surfaces clear and reinforce spatial calm
This restraint strategy, rooted in established design principles, creates small footprints that feel psychologically expansive.
Select Low-Profile Furniture to Preserve Openness
I’ll strategically select low-profile furniture, including slim-profile sofas with exposed wooden legs, armless chairs with track arms, and media consoles under 16 inches tall. These pieces maintain visual lightness while anchoring your seating arrangement.
Low-Profile Seating Arrangements
Why does furniture height matter so much in compact open-plan spaces? Low-profile seating preserves sightlines, making rooms feel expansive rather than cramped. I recommend these space-saving furniture strategies:
- Choose sofas under 32 inches tall with slender backrests that minimize visual mass
- Select armless chairs or compact loveseats that tuck efficiently without blocking walkways
- Incorporate ottomans and low-back benches as flexible boundaries between kitchen and living zones
Light, neutral upholstery paired with slim legs further reduces visual weight. Petite-framed pieces with narrow arms create breathing room in tight layouts. When you prioritize low-profile seating in open-plan designs, you’re investing in both functionality and perceived spaciousness.
This approach keeps your living area feeling well-organized rather than overcrowded, allowing natural movement throughout the combined space.
Streamlined Furniture Selection Strategy
Low-profile seating creates the foundation for open-plan comfort, but your furniture selection extends far beyond the sofa. I recommend choosing every piece strategically to maintain sightlines and flow throughout your space. Select low-profile furniture: tables, chairs, and consoles measuring 32–34 inches or lower that won’t visually interrupt your room’s continuity. Modular pieces like compact sectionals or two-piece sofa sets adapt to your layout without overwhelming square footage.
Prioritize multifunctional storage solutions: narrow coffee tables with drawers, slim consoles doubling as dining surfaces, and benches offering seating plus hidden organization. Expose furniture legs whenever possible; this design choice creates visual lightness and simplifies floor cleaning. Opt for armless chairs and streamlined frames in neutral tones. These deliberate selections preserve openness while keeping your small kitchen-living area both functional and inviting.