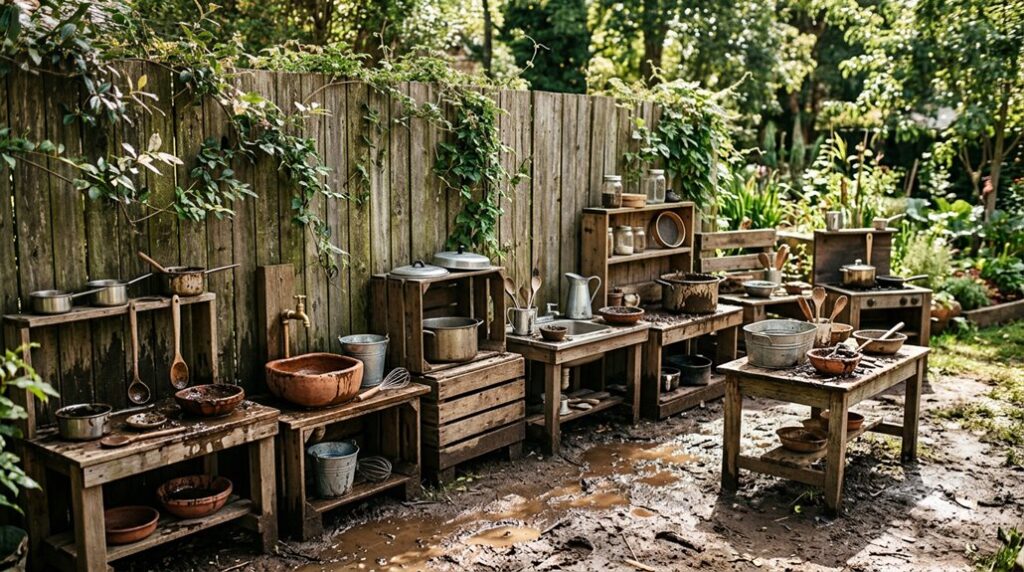
I’ve watched countless backyards develop into genuine learning spaces through thoughtfully designed mud kitchens. You don’t need expensive equipment or elaborate construction; just strategic placement, durable materials, and seasonal adaptability.
The difference between a mud kitchen that thrives year-round and one that becomes overgrown clutter comes down to foundational decisions you’ll make before breaking ground. Here’s what separates functional play spaces from forgotten investments.
Find the Perfect Spot for Your Mud Kitchen
Where should you position your mud kitchen to maximize both accessibility and supervision? I recommend selecting a shaded area near your back door, which streamlines water access and keeps children within sight. This proximity creates a natural gathering space where outdoor play happens intentionally rather than haphazardly.
Consider the practical elements: adequate shade prevents heat exhaustion during extended sessions, while a nearby water source eliminates constant trips indoors. Position your mud kitchen away from high-traffic zones and barking dogs; distractions compromise focus and safety.
The ideal spot combines knee-height work surfaces with vertical storage for utensils and containers, ensuring children develop independence through accessible design. Backyards with partial visibility from kitchen windows offer optimal supervision without hovering, fostering confidence while maintaining watchful presence.
Build Your Work Surface on a Budget

Once you’ve secured your ideal location, the next consideration is constructing a functional work surface that won’t strain your budget. I recommend exploring several DIY approaches.
Pallet and crate setups offer handmade, sustainable options requiring only sanding and personalization time. Cinder block configurations provide seven baking holes, weather durability, and affordable construction. Pavers combined with scrap wood create portable, whimsical designs that remain easy to clean.
Repurposing an old plastic play kitchen from thrift stores delivers outdoor durability at minimal cost, though drainage varies by model. Plastic containers and bowls form compact sensory stations perfect for tight backyards. Each mud kitchen option balances affordability with functionality, enabling you to establish an engaging outdoor space that grows with your family’s needs.
Gather 15 Essential Mud Kitchen Tools
I’ve assembled the fifteen essential tools you’ll need by focusing on core cooking implements and strategic thrifting that builds capability without breaking your budget. Your foundation includes bowls, pots, pitchers, wooden spoons, ladles, whisks, strainers, muffin tins, cutting boards, funnels, measuring cups and spoons, plus trays, each selected for durability and multi-purpose function in outdoor mud play.
Sourcing these items from thrift stores, estate sales, and discount retailers yields sturdy stainless steel and ceramic pieces at a fraction of retail cost, allowing you to prioritize quality construction over new packaging.
Core Tools For Cooking
The foundation of any functional mud kitchen rests on a well-chosen collection of tools that supports outdoor play and genuine culinary exploration. You’ll want essential core tools: bowls in varying sizes, sturdy pots, wooden spoons, and ladles that invite scooping and stirring. Add measuring cups and spoons so children practice proportion and estimation.
A cutting board provides a designated prep surface, while muffin tins enable portion control and creative molding. Whisks, strainers, and pitchers round out your setup, supporting realistic cooking sequences. I recommend sourcing these mud kitchen tools through thrift stores, where you’ll find durable, non-toxic options at fraction costs. Metal and wood materials withstand moisture better than plastic, providing longevity through seasons of imaginative play.
Budget-Friendly Thrifting Strategies
How can you build a fully functional mud kitchen for under $50? I source durable outdoor tools from local thrift stores, prioritizing metal pots, pans, and BPA-free plastic utensils that withstand weather exposure. This budget-friendly approach creates an inexpensive outdoor play space without breaking the bank.
Essential thrift store finds for your mud kitchen:
- Stainless steel mixing bowls, pitchers, and ladles
- Wooden spoons, measuring cups, and muffin tins
- Metal colanders and perforated serving utensils
- Plastic storage crates for organizing supplies
A thrifted mud kitchen supplies durable outdoor tools at fraction-retail costs. I focus on items with visible longevity: rust-resistant metals and quality plastics.
Low-cost setup options like repurposed play kitchens or cinder block structures maximize affordability while maintaining functionality. This approach builds community engagement around sustainable, resourceful outdoor play that welcomes families into creative experimentation.
Design Mud Kitchen Stations by Age
I’ve designed mud kitchen stations that grow with your child’s developmental needs, and matching setup height, tools, and activities to each age group builds both engagement and skill-building. For toddlers, I keep surfaces at knee-to-hip height with large plastic cups, ladles, and shallow basins that invite fill-and-spill play.
For preschoolers, I position counters at elbow height and add measuring cups, whisks, and labeled bins that support bakery and café pretend scenarios. For early elementary learners, I introduce clipboards, graduated jugs, sieves, and balance scales alongside open-ended prompts like designing canal systems, which scaffold scientific thinking and planning skills.
Toddler-Friendly Setup Essentials
When designing a mud kitchen for toddlers ages one to three, you’ll want to prioritize accessibility and safety above all else. I recommend establishing stations at elbow height with shallow tubs and low-surface counters that accommodate your child’s reach without strain.
Essential elements for a toddler-friendly backyard play setup include:
- Large-grip tools like ladles and oversized spoons that prevent choking hazards
- Labeled bins organized at eye level to encourage independent sensory play
- A shallow water play station positioned near handwashing facilities
- Non-toxic ingredients and materials throughout the mud kitchen
Short, open-ended prompts such as “fill and spill” match toddlers’ attention spans while fostering water play exploration. Position your safe setup where you can supervise closely. This deliberate design creates an accessible sensory environment in your backyard space where young learners develop confidence through mud kitchen engagement.
Preschooler Pretend Play Stations
Where does imaginative play flourish in a mud kitchen? I’ve found that preschooler pretend play stations thrive when you position workstations at elbow height, creating accessible spaces for role play and imaginative cooking experiences. Your outdoor play space benefits from labeled bins containing measuring cups, spoons, whisks, and muffin tins, tools that develop fine-motor skills while children explore counting and measuring activities.
| Station Element | Purpose |
|---|---|
| Elbow-height workspace | Encourages independent exploration |
| Labeled ingredient bins | Supports literacy and organization |
| Measuring tools set | Promotes numeracy and motor development |
| Chalkboard menu board | Enables recipe design and language practice |
I recommend positioning stations near water access with low storage, allowing children to self-direct their imaginative cooking. Simple prompts like “design a three-ingredient recipe” spark collaborative play while reinforcing foundational academic skills through tangible, sensory engagement.
Early Elementary Learning Activities
How can mud kitchens evolve to challenge early elementary learners’ developing cognitive abilities? I’ve found that integrating structured literacy and numeracy builds on imaginative play to create genuine learning opportunities. Your outdoor kitchen should support independent planning through clipboards, labeled bins, and graduated jugs that encourage measuring during pretend cooking.
A balance scale introduces weight concepts naturally, while a simple pump sprayer develops fine motor control.
This mud kitchen setup fosters early elementary learning through:
- Recipe reading and menu writing activities that build literacy skills
- Measuring ingredients and weighing components for mathematical practice
- Canal system design prompts that develop problem-solving abilities
- Dissolving process experiments that introduce basic scientific thinking
I recommend positioning the counter at appropriate height with accessible storage. These deliberate design choices create a backyard space where early elementary learners develop cognitive skills while engaging in meaningful outdoor kitchen exploration.
Add Seasonal Elements Year-Round

Because mud kitchens thrive on novelty and exploration, you’ll want to rotate natural ingredients throughout the year to sustain your child’s engagement and capitalize on what each season naturally provides. Summer calls for ice and mint additions, while fall introduces leaves and spices that shift sensory play. Winter brings snow bricks and stored dried materials, spring offers blossoms for tactile discovery. This seasonal rotation maintains freshness in your mud kitchen ideas without requiring constant purchasing.
Your weatherproof setup requires minimal adjustments: shallow water depths, non-toxic wood sealers, and season-appropriate gear enable continuous year-round play. End-of-play storage routines matter significantly, with sun-drying tools after summer and draining water before winter preventing deterioration. These intentional seasonal transitions create an evolving environment that sustains children’s curiosity across all months.
DIY or Store-Bought: Pick Your Approach

When you’re ready to build your mud kitchen, you’ll face a fundamental choice: constructing one yourself or purchasing a pre-made unit.
A DIY mud kitchen using pallets or cinder blocks offers customization and cost savings, though it demands time and building skill. Store-bought options provide weather-resistant designs and immediate deployment, requiring minimal expertise.
Consider your priorities:
- Pallet configurations: Budget-friendly, repurposed materials, moderate assembly complexity
- Cinder block structures: Durable “oven” aesthetics, permanent installation, heavy lifting required
- Ready-made plastic units: Weather-resistant design, drainage challenges over time, higher upfront cost
- Paver constructions: Natural aesthetics, portability, moderate expense
DIY mud kitchen projects offer ownership satisfaction and tailored mud kitchen accessories. Store-bought alternatives eliminate guesswork, though they may present maintenance issues.
Evaluate your timeline, budget, and skill level honestly before deciding. Your outdoor play space reflects this choice.
Clean Up Daily: Your 5-Minute Routine

You’ve selected your mud kitchen structure—whether it’s a pallet-built DIY project or a store-bought plastic unit—and now the real work begins with maintenance. I’ve found that a consistent cleanup routine keeps your mud kitchen organized and ready for tomorrow’s play.
My daily routine takes five minutes. I rinse tools immediately after play, draining water completely to prevent mildew. I dunk towels and aprons in a designated wash basin, quick-scrubbing before storage. Labeled storage bins keep everything accessible and organized.
I wipe down work surfaces, then position tools on a drying rack positioned for sun exposure. This systematic approach keeps your mud kitchen functional, hygienic, and welcoming for your family’s continued outdoor engagement.