If your kitchen feels like a cave, you’re not alone—and you have solutions available. I’ll walk you through ten strategies that professionals use to remove spatial constraints and create connected living areas.
From removing structural walls to repositioning cabinetry, each approach balances openness with functionality. What you’ll discover is that the best solution depends on your layout, budget, and how your family actually moves through the space. Let’s explore what’s possible.
Remove the Wall and Open Your Kitchen

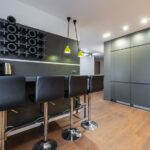
When you’re ready to redesign a cramped kitchen into an open, flowing space, removing the pass-through wall is often the first major decision. It’s one that fundamentally reshapes both your layout and your design possibilities. I repositioned base cabinets toward the room’s center, creating a functional island where the peninsula once stood.
This open-layout approach demands strategic storage solutions. Though removing the wall eliminated upper cabinets, I compensated by installing taller uppers and enhancing lower storage with pull-out wastebaskets and corner lazy Susan units. The result preserves functionality while establishing that desired open feel. You’re not sacrificing practicality for aesthetics; you’re recalibrating both.
Pass-through walls unnecessarily fragment kitchens. Removing yours invites connection between spaces while maintaining the storage efficiency that makes cooking workable.
Build a Centered Island
How do you make use of a removed pass-through in your kitchen’s most functional area? A centered island becomes that key point. By moving base cabinets into the room’s middle, you replace the former opening with a prominent workspace. This reconfiguration eliminates upper cabinets along the wall, requiring strategic storage optimization through enhanced lower cabinetry and taller uppers elsewhere. You’ve redistributed, not reduced, your storage capacity.
A centered island replaces removed pass-throughs, converting wasted space into functional workspace while redistributing storage strategically throughout your kitchen.
Consider these elements:
- Island dimensions: 4–5 feet long, 2–3 feet deep for workflow balance
- Open shelving: Lower sections for cookbooks and décor visibility
- Counter material: Durable quartz or butcher block for durability
- Vertical compensation: Floor-to-ceiling cabinets on perimeter walls
This approach converts unused space into usable kitchen real estate while maintaining your storage footprint.
Preserve Storage: Lower and Taller Cabinets

Removing upper cabinets creates visual openness, but you’ll need a strategic reconfiguration to maintain your kitchen’s storage capacity. I’ve found that expanding lower cabinet depth and installing taller upper units compensates for the lost wall height without sacrificing storage. This approach maximizes vertical efficiency while keeping frequently used items within arm’s reach.
Practical additions enhance this strategy. A pull-out wastebasket in your base cabinets streamlines daily cleanup and organization. Corner lazy Susan cabinets repurpose awkward spaces into accessible storage solutions, eliminating wasted corner footage.
The result? You’ll achieve that coveted open-concept aesthetic without the storage compromise. Your kitchen maintains full functionality while gaining breathable sightlines. By reconfiguring base and tall cabinet capacity thoughtfully, you’re investing in both visual appeal and practical efficiency, a balanced design solution that works well.
Add Pull-Out Bins and Corner Cabinets

I’ve found that pull-out waste-bin systems and corner lazy Susan cabinets help you organize lower cabinet zones, especially when you’re removing upper cabinetry to open your kitchen visually. These solutions address two critical challenges: pull-outs keep trash and recycling contained and accessible in open layouts, while corner carousels eliminate those awkward dead zones by rotating stored items into reach from multiple angles.
Together, they preserve storage capacity without requiring additional wall space, allowing you to maintain functionality while achieving that streamlined, modern look that pass-through kitchens demand.
Maximizing Lower Cabinet Space
Lower cabinets offer prime real estate for storage, yet many homeowners don’t fully capitalize on this valuable footprint. Strategic organizational solutions help these spaces work more efficiently in your kitchen.
- Pull-out drawers accommodate deeper storage for pots, pans, and small appliances while keeping items accessible
- Full-extension slides enable complete access to cabinet backs, eliminating unreachable dead zones
- Corner storage solutions utilize lazy Susan cabinets to maximize typically wasted corner space
- Wastebasket pull-outs conceal everyday trash discreetly while preserving usable footprint
These modifications work synergistically. Full-extension slides paired with deeper cabinets create substantial capacity. Corner lazy Susans rotate frequently used items within arm’s reach.
Pull-out bins organize trash inconspicuously. When paired with taller upper cabinets, your lower storage achieves balance, maintaining both accessibility and visual proportion throughout your kitchen pass-through design.
Corner Accessibility Solutions
While pull-out drawers and full-extension slides enhance your lower cabinet’s usability, corner spaces often remain problematic. They’re deep, awkward to access, and frequently become dumping grounds for forgotten items. Corner cabinets with lazy Susan rotating mechanisms or pull-out systems make these dead zones functional storage.
| Solution | Benefit | Best For |
|---|---|---|
| Lazy Susan Carousels | 360° rotation access | Spices, small appliances |
| Pull-Out Bin Systems | Waste/recycling separation | Organized workflows |
| Full-Height Cabinets | Vertical storage | Bulky, seldom-used items |
Installing pull-out systems alongside corner cabinets creates seamless accessibility. These integrated solutions eliminate wasted space while keeping recyclables concealed yet convenient.
When you combine rotating mechanisms with pull-out bins, you’re establishing a storage zone that works harder for your kitchen’s layout and your daily routines.
Brighten With Light Countertops

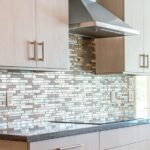
How do you maximize the luminosity that comes from opening up your kitchen? White stone countertops reflect light and brighten your space, creating the open environment you’ve worked to achieve. I’ve found that pairing light countertops with dark floors, as seen in contemporary remodels, creates striking contrast that emphasizes spaciousness and modernizes your kitchen.
White stone countertops reflect light and brighten your kitchen, while pairing them with dark floors creates striking contrast and modernizes your space.
Lighter materials work strategically with taller upper cabinets, maintaining balanced aesthetics after storage modifications. They provide clean backdrops that highlight new features such as central islands or peninsulas without visual competition.
Consider these implementation strategies:
- Install white stone surfaces to amplify natural and artificial light
- Pair light countertops with darker flooring for visual depth
- Combine updated lighting fixtures with reflective surfaces
- Use bright countertops to showcase architectural focal points
These elements work together to create an inviting, visually expansive kitchen environment.
Define Zones With Contrasting Flooring

I’ll use contrasting flooring to visually separate your kitchen from adjacent living spaces, creating distinct zones without closing off the area entirely. Dark hardwood floors paired with lighter materials in neighboring rooms, or switching to a central island with a different finish, will signal functional boundaries while maintaining the openness that pass-through designs provide. A durable, consistent material beneath both zones allows color and texture contrasts to define where cooking stops and dining begins.
Flooring Materials Create Visual Separation
Why settle for walls when flooring can accomplish the same spatial definition? Flooring materials create visual separation that guides movement through your space while maintaining the open-concept flow you’re after. Strategic contrast in flooring establishes clear zoning without architectural barriers.
Consider these approaches:
- Dark hardwood in living areas paired with light tile in the kitchen creates an immediate material boundary that signals functional shift
- Consistent tile patterns at transition points subtly mark off spaces and reduce visual confusion
- Coordinating floor colors with cabinetry strengthens the connection within each zone while emphasizing distinct purposes
- Micro-thresholds or level changes reinforce zoning while preserving accessibility
The contrast between materials, whether transitioning from warm wood to cool ceramic or matte to polished finishes, accomplishes what walls once did. Your eye naturally recognizes these boundaries, organizing the layout into purposeful zones that feel organized and connected at the same time.
Color Contrast Defines Kitchen Zones
When you’re working with an open kitchen layout, contrasting flooring colors accomplish what traditional walls cannot: they establish distinct functional zones while maintaining visual connectivity. Dark hardwood beneath light countertops creates an anchoring effect that separates cooking from dining areas through the pass-through. This contrast guides movement naturally, preventing the space from feeling chaotic.
Lighter white stone countertops paired with darker floors enhance depth perception and zone differentiation simultaneously. A blue-gray backsplash reinforces this zoning strategy while unifying your color palette. Consider positioning a central island against a different floor shade; this transition area further emphasizes functional boundaries by directing sightlines and foot traffic.
The key lies in selecting materials with sufficient color separation. This deliberate contrast creates organized, purposeful zones without sacrificing the connected, welcoming atmosphere you desire.
Transitions Between Functional Areas
Contrasting flooring accomplishes what color alone cannot: it creates a physical demarcation line that separates your kitchen’s work zone from adjacent living or dining spaces. This zoning strategy works through material shifts and directional changes at your pass-through, signaling transitions without requiring walls.
Consider these flooring strategies:
- Wood-to-tile transitions at pass-throughs accommodate different wear patterns and moisture exposure, protecting both surfaces from kitchen demands
- Direction changes, such as running planks perpendicular to adjacent flooring, reinforce functional boundaries while maintaining visual continuity
- Transition borders or stripes subtly separate areas, creating intentional rather than abrupt shifts between zones
- Coordinated color palettes using complementary tones unify your space while clearly delineating the cooking area from social spaces
This approach turns your kitchen pass-through into a designed threshold that belongs within your home’s larger spatial narrative.
Add a Blue-Gray Backsplash

How can you refresh a kitchen’s visual weight without overhauling your cabinetry? A blue-gray backsplash offers an elegant solution. This neutral tone creates a modern rustic contrast when paired with white stone countertops and dark hardwood floors, establishing kitchen openness that didn’t exist before. The blue-gray backsplash balances rustic elements, such as tin utensil buckets, while maintaining cohesion throughout your space.
It complements Hudson-style doors and urban finishes for a cleaner aesthetic. If you’re working with a large island, the backsplash visually softens the room by tying together upper and lower cabinet tones. In kitchen remodels, selecting a blue-gray backsplash supports modernized aesthetics without requiring significant cabinet investments, making it an accessible upgrade that changes your kitchen’s entire appearance.
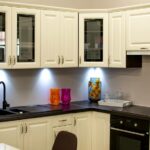
Choose Modern Cabinet Doors

Modern cabinet doors can revamp your kitchen’s entire visual character. I’ve found that replacing ornate beadboard with Hudson-style doors creates an urban aesthetic that complements open-concept storage beautifully. This shift reduces visual clutter while maintaining functionality.
Consider these design strategies:
- Install taller upper cabinet doors to enhance perceived height and openness
- Pair sleek flat-panel doors with updated hardware for contemporary cohesion
- Choose glass-front options to display dishware while preserving the modern feel
- Combine dark cabinetry with white stone countertops and blue-gray backsplashes for visual balance
The modern cabinet door approach works particularly well in kitchens transitioning from traditional styles. White stone surfaces paired with these streamlined doors create an updated, sophisticated environment.
Taller proportions contribute to a lighter, more expansive kitchen space that feels purposefully designed rather than cluttered.
Balance Modern and Rustic Decor
Why settle for one aesthetic when you can blend both? I’ve found that pairing clean, urban elements like white stone countertops and blue-gray backsplashes with warm textures creates a sense of balance in your pass-through. A dark hardwood floor provides striking contrast to lighter surfaces, enhancing rustic warmth without overwhelming the sleek design.
For storage and function, a central island with tall upper cabinets maintains practicality while achieving balance. Hudson-style cabinet doors replace beadboard with contemporary lines while preserving natural wood tones that whisper rustic charm.
Decorative accents complete the look. Distressed wood or metal-finished storage items complement both styles, tying your space together without leaning heavily toward either direction. This approach brings modern and rustic elements into harmony in your pass-through, allowing both aesthetics to coexist seamlessly.
Budget, Timeline, and Your First Call to a Designer
Before you commit to removing walls or repositioning cabinetry, you’ll want realistic figures on costs and timeline. An initial designer consultation provides exactly this, giving you concrete estimates rather than guesswork.
I recommend gathering three to five quotes from certified kitchen designers (like those at CliqStudios). Each quote should detail labor, materials like your white stone countertops and blue-gray backsplash tile, and the weeks required for ordering custom cabinetry and installation. Your first conversation should address whether your budget accommodates structural changes, what storage solutions work best for your layout, and how long the full project takes from design approval through final walkthrough.
Planning Your Remodel Budget
Every successful kitchen pass-through project hinges on three foundational elements: a realistic budget, a defined timeline, and early collaboration with a designer who understands your vision.
I recommend establishing your overall budget first, then adding a contingency reserve of 10–20% for unexpected changes. Set clear milestones across your timeline:
- Design finalization and approval
- Permit applications and approvals
- Material ordering and delivery windows
- Installation and completion phases
Before contacting a designer, identify your core priorities. Do you need additional storage near the pass-through? Will an island anchor the new layout? These decisions shape scope and cost.
Schedule an initial consultation to review your existing kitchen layout, share inspiration images, and receive a preliminary estimate. This alignment prevents costly revisions later.
Timeline Expectations For Renovation
How long does a kitchen pass-through project actually take? Most renovations require 4 to 14 weeks total, depending on scope and material availability. The design phase typically consumes 2 to 6 weeks for approvals and finalization. Construction itself spans 2 to 8 weeks, though cabinet lead times significantly impact your schedule.
Stock options need 4 to 8 weeks, while custom cabinetry demands 12 to 16 weeks.
| Phase | Duration | Priority |
|---|---|---|
| Design & Approvals | 2–6 weeks | High |
| Product Ordering | 4–16 weeks | Critical |
| Construction | 2–8 weeks | High |
| Contingency Buffer | 10–20% | Essential |
| Total Project | 4–14 weeks | Baseline |
Before your first designer call, define your goals, budget range, and preferred finishes. Build contingency planning into your timeline to absorb design changes, backorders, or framing adjustments. This preparation helps you set realistic expectations and stay on track throughout the project.
Initial Designer Consultation Steps
Now that you’ve mapped out realistic timelines for your project, you’re ready to sit down with a designer and translate your vision into practical plans. Your first call establishes the project scope and sets expectations for budget allocation and structural work.
During this consultation, you’ll discuss three critical elements:
- Peninsula design specifications: Rotating base cabinets into the room’s center creates a center point while defining distinct zones
- Storage space solutions: Enhanced lower cabinetry compensates for removing upper units, maintaining functionality throughout the kitchen
- Openness priorities: Removing the pass-through increases sightlines and flow between adjoining spaces
- Cost and timeline realism: Structural changes versus cosmetic updates determine project duration and expense
A qualified designer helps you balance removing upper cabinets with maintaining adequate storage. Your peninsula functions as both workspace and visual anchor for your kitchen’s new openness.