
Halloween is a time for creativity, and what better way to showcase your culinary skills than with a spooky skull baking pan recipe?
These delightful treats not only capture the spirit of the season but also bring a playful twist to any gathering.
The rich flavors and intricate designs of these baked goods will impress your guests and make your Halloween party unforgettable.
Whether you’re making eerie desserts or savory snacks, skull-shaped creations are sure to be a hit at any event, from Halloween to themed gatherings year-round.
The History and Cultural Significance
• Skull baking pan recipes for Halloween and beyond trace their origins to ancient celebrations of the dead, particularly in cultures like the Mexican Día de los Muertos.
• The tradition of using skulls in baking evolved as various cultures embraced the symbolism of death and rebirth, leading to creative interpretations in food.
• In many cultures, these treats are used during specific occasions like Halloween or All Souls’ Day, symbolizing the connection between life and death.
• While many variations exist, the authentic skull treats often maintain a rich flavor profile, typically featuring ingredients like chocolate, vanilla, or spices that evoke festive feelings.
Recipe Overview
Nutritional Information (per serving)
Ingredients
Essential Equipment Guide
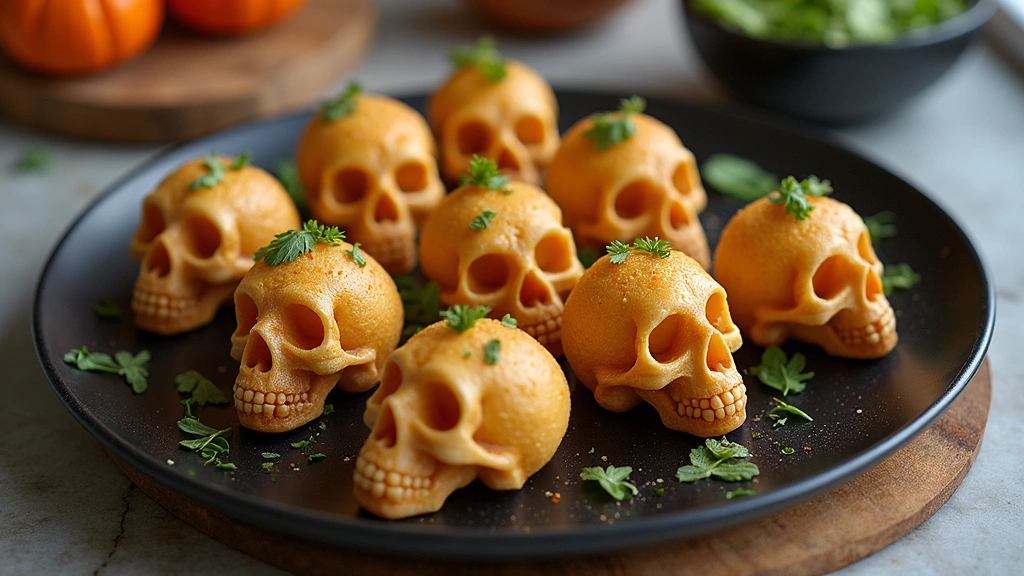
Skull Baking Pan: This specific tool is essential for achieving the iconic shape of these treats. Look for a non-stick silicone or metal version for easy release and even baking. A deep pan will help create more defined features in the skull shape.
Mixing Bowls: Sturdy mixing bowls are important for combining your ingredients effectively. Choose a variety of sizes to accommodate different mixtures, and opt for glass or stainless steel for durability and ease of cleaning.
Electric Mixer: An electric mixer will save you time and effort when blending your batter. Look for one with multiple speed settings to ensure thorough mixing without overworking the batter.
Preparation Methods
Mixing Technique: Proper mixing technique is essential for achieving light and airy baked goods. Start by creaming the butter and sugar until fluffy, then add eggs one at a time. Ensure all ingredients are at room temperature for optimal incorporation.
Folding: This gentle technique prevents over-mixing, which can lead to tough baked goods. Fold the dry ingredients into the wet mixture using a spatula, working slowly to retain air in the batter.
Decorating: Proper decoration is key to making your skull treats visually appealing. Use a piping bag for precise icing application and drizzle melted chocolate for added flair.
Step 1: Prepare Ingredients

Gather all your ingredients on the counter.
Ensure that your butter is softened and eggs are at room temperature.
This will help the ingredients combine more easily.
Measure everything out to streamline the mixing process.
Step 2: Preheat the Oven

Preheat your oven to 350°F (175°C).
This ensures that the batter bakes evenly and rises properly.
Allow the oven to fully heat before placing your pans inside.
Using an oven thermometer can help verify the temperature accuracy.
Step 3: Make the Batter

In a large mixing bowl, cream together the softened butter and granulated sugar until light and fluffy.
Add the eggs one at a time, mixing well after each addition.
Gradually incorporate the milk and vanilla extract into the mixture.
Sift the flour and baking powder together and fold into the wet ingredients until just combined.
Step 4: Fill the Skull Pan

Carefully spoon the batter into each cavity of the skull baking pan.
Fill each cavity about 2/3 full to allow for rising without overflowing.
Use a spatula to smooth the tops of the batter if necessary.
Tap the pan gently on the counter to remove any air bubbles.
Step 5: Bake the Skulls

Place the filled skull pan in the preheated oven.
Bake for 20-25 minutes or until a toothpick inserted in the center comes out clean.
Keep an eye on them to avoid overbaking, which can dry them out.
The tops should be lightly golden and spring back when touched.
Step 6: Cool the Skulls

Remove the pan from the oven and let it cool for 10 minutes.
Carefully invert the pan to release the skulls onto a wire rack.
Allow the skulls to cool completely before decorating.
This prevents the icing from melting when applied.
Step 7: Prepare the Icing

In a medium bowl, combine powdered sugar, softened butter, vanilla extract, and milk.
Mix until smooth and creamy, adjusting the milk for desired consistency.
This icing should be thick enough to hold its shape but spreadable.
Set aside while you prepare for decorating.
Step 8: Decorate the Skulls

Using a piping bag, apply icing to the cooled skulls to create facial features.
Drizzle melted chocolate over the top for added decoration.
Sprinkle edible glitter on top for a festive touch.
Let the decorations set before serving.
Critical Timing and Temperature Guide
Mixing Ingredients: Aim to cream butter and sugar for about 3-5 minutes until fluffy. This helps incorporate air, which is essential for a light texture. Avoid overmixing once you add the dry ingredients to prevent toughness.
Baking Time: Bake the skulls for 20-25 minutes at 350°F (175°C). Check for doneness with a toothpick; it should come out clean, and the tops should spring back when touched. Underbaking can lead to a gooey center, while overbaking can dry them out.
Cooling Period: Allow the baked skulls to cool for at least 10 minutes in the pan before inverting. This helps them set and prevents breakage. Cooling them completely on a wire rack is crucial for decorating.
Pro Tips for Skull Baking Pan Recipes For Halloween And Beyond
• Ingredient Selection: Choose high-quality butter and real vanilla extract, as they significantly enhance flavor.
• Preparation Secret: Consider chilling the batter for 30 minutes before baking to improve texture and rise.
• Temperature Management: Ensure all ingredients are at room temperature for better emulsification and mixing.
• Texture Enhancement: Use cake flour instead of all-purpose flour for a softer crumb.
• Flavor Layering: Incorporate spices like cinnamon or nutmeg for a warm, festive flavor.
• Make-Ahead Strategies: Bake and cool the skulls a day in advance; store them in an airtight container.
• Restaurant-Quality Finishing Touches: Use a torch to lightly caramelize the tops for a unique finish.
• Equipment Optimization: If you don’t have a skull pan, muffin tins can be used with skull-shaped liners.
Troubleshooting Common Issues
• Texture Too Dense: This often occurs from overmixing the batter. To prevent this, mix until just combined after adding dry ingredients. If it happens, try adding a splash of milk to the batter before baking to lighten it.
• Skulls Sticking to the Pan: Insufficient greasing can cause sticking. Ensure you grease the pan well with butter or cooking spray, or use a silicone pan for easier release.
• Uneven Baking: This can result from overcrowding the oven. Always leave space around pans for air circulation. Rotate the pan halfway through baking for even results.
• Flavor Too Sweet: If the treats are overly sweet, balance with a pinch of salt in the batter. This enhances flavors and cuts sweetness.
• Decorating Issues: If icing is too runny, add more powdered sugar to achieve the right consistency. If too thick, add a tiny bit of milk gradually.
Variations and Regional Differences
• Mexican Sugar Skulls: These traditional treats are made with a different dough, often flavored with cinnamon and decorated with vibrant icing, representing loved ones.
• Chocolate Skull Cake: A decadent variation using chocolate cake batter, filled with chocolate ganache, and decorated with dark and white chocolate drizzle.
• Vegan Skull Treats: Substitute eggs with flaxseed meal and use a plant-based butter to create a vegan-friendly version.
• Modern Interpretations: Incorporate trendy flavors like matcha or pumpkin spice to give a contemporary twist while keeping the skull shape.
Food Science Behind the Recipe
• Leavening Agents: Baking powder is crucial as it creates carbon dioxide bubbles, causing the batter to rise and become fluffy. Understanding how it works helps control the final texture.
• Emulsification: The process of mixing butter and sugar introduces air, which is vital for creating a light and airy structure. Proper emulsification ensures even distribution of ingredients.
• Heat Transfer: The baking process involves conduction, where heat moves from the pan to the batter. Ensuring an even oven temperature is key to consistent baking results.
Frequently Asked Questions
What’s the most common mistake people make when preparing skull baking pan recipes? Overmixing the batter is a frequent mistake that can lead to dense treats. To prevent this, mix until just combined once you add the dry ingredients.
Can I prepare components of this dish in advance? Yes, you can bake the skulls a day in advance and store them in an airtight container to maintain freshness.
How do I adapt this recipe for dietary restrictions? For a gluten-free version, substitute all-purpose flour with a gluten-free blend, and for vegan options, replace eggs with flaxseed meal and use plant-based butter.
What’s the best way to store and reheat leftovers? Store leftovers in an airtight container at room temperature for up to 2 days. To reheat, gently warm in the oven at 300°F until just warm, avoiding microwaving.
Can I freeze this dish? Yes, you can freeze the baked skulls. Wrap them tightly in plastic wrap and place them in a freezer bag for up to 2 months. Thaw them at room temperature before decorating.
What wine or beverages pair best with this dish? A sweet dessert wine or spiced cider complements the flavors of the skull treats well, balancing sweetness with acidity.
How can I scale this recipe up for a crowd? Simply multiply each ingredient by the number of servings you need, and ensure you have enough baking pans to accommodate the batter.
What side dishes complement this recipe best? Serve with a light fruit salad or a spiced pumpkin soup for a complete fall-themed meal.
How do professional chefs elevate this dish for restaurant service? Professional chefs might use custom molds for intricate designs and incorporate unique flavors like lavender or chai for a gourmet twist.
Serving and Presentation Guide
• Traditional Presentation: Arrange the skull treats on a platter, dusted with powdered sugar and garnished with fresh herbs or edible flowers for a striking contrast.
• Modern Plating Ideas: Stack the skulls on a slate board with drizzles of chocolate sauce and colorful fruit purees for a contemporary look.
• Accompaniment Suggestions: Pair with spiced whipped cream or a scoop of vanilla ice cream for added indulgence.
• Special Occasion Presentation: Use themed decorations like cobwebs or mini pumpkins around the base for Halloween parties, enhancing the spooky vibe.
Conclusion
Skull baking pan recipes offer a fun and festive way to celebrate Halloween and other occasions.
With a little creativity in the kitchen, you can impress your guests and create lasting memories.
I encourage you to try this recipe and put your spin on it, making it your own.
Happy baking and enjoy the deliciously spooky results!


