
Baking pizza on a stone is an art that transcends the ordinary, bringing the pizzeria experience right into your home.
The combination of high heat and even cooking creates a crust that’s crispy on the outside and chewy on the inside, elevating your homemade pizza to gourmet status.
I first fell in love with this technique during a pizza-making class in Naples, where locals shared their secrets for achieving the perfect pie.
Whether it’s a classic Margherita or a bold BBQ chicken, using a pizza stone promises results that will impress family and friends alike.
The History and Cultural Significance
• The Ultimate Guide To Pizza Stone Baking traces its origins to Italy, dating back to the 18th century when flatbreads were baked in wood-fired ovens.
• The dish evolved over decades as pizza transitioned from a street food to a culinary staple, eventually gaining popularity worldwide.
• In Italy, pizza is traditionally enjoyed during family gatherings and celebrations, symbolizing community and shared joy.
• While many variations exist across different regions, the authentic version maintains a thin crust that sets it apart from its thicker counterparts.
Recipe Overview
Nutritional Information (per serving)
You Might Also Like

Ingredients
Essential Equipment Guide
Pizza Stone: A high-quality pizza stone is crucial for achieving that pizzeria-style crust. Look for a stone made of cordierite or ceramic, which retains heat evenly. Avoid thin or lightweight stones that can crack under high temperatures.
Pizza Peel: This flat wooden or metal tool is essential for transferring your pizza to and from the hot stone. A peel with a smooth surface makes it easier to slide the pizza off without disturbing the toppings.
Rolling Pin: While some prefer to stretch their dough by hand, a rolling pin ensures uniform thickness. Opt for a lightweight, well-finished rolling pin for ease of use and better control.
Preparation Methods
Proofing Yeast: This technique is essential for activating dry yeast to ensure your dough rises properly. Mix warm water with sugar and yeast, letting it sit for about 5-10 minutes until frothy. This step ensures that your yeast is alive and ready to work.
Dough Stretching: Instead of rolling out the dough, stretching it by hand maintains its airiness. Start from the center and gently push outward, allowing gravity to help. Avoid using too much flour during this process to keep the dough’s moisture intact.
Par-Baking: Pre-baking the crust for a few minutes before adding toppings can help prevent sogginess. Bake the naked dough on the pizza stone at high heat for about 5 minutes until lightly golden, then add sauce and toppings.
Step 1: Prepare Ingredients

Gather all your ingredients and tools before starting.
Measure out the flour, water, salt, and yeast precisely for best results.
Ensure your toppings are prepped and ready to go to streamline the cooking process.
This organization will help you maintain focus and efficiency as you bake.
Step 2: Proof the Yeast

In a small bowl, combine warm water (about 110°F) with sugar and yeast.
Let it sit for 5-10 minutes until frothy, indicating the yeast is active.
This step is crucial for ensuring your dough rises properly.
If the mixture doesn’t froth, your yeast may be dead; start over with fresh yeast.
Step 3: Make the Dough

In a large mixing bowl, combine flour and salt.
Add the frothy yeast mixture and mix until a dough forms.
Knead the dough on a floured surface for about 5-7 minutes until smooth and elastic.
A well-kneaded dough is essential for the perfect crust texture.
Step 4: Let it Rise

Place the dough in a lightly greased bowl and cover it with a damp cloth.
Let it rise in a warm place until doubled in size, about 1 hour.
This fermentation process develops flavor and structure in the dough.
Check for a puffy appearance to ensure optimal rising.
Step 5: Preheat the Oven

While the dough is rising, preheat your oven to the highest setting, usually around 500°F.
Place your pizza stone in the oven to heat up for at least 30 minutes.
A hot stone is key to achieving a crispy crust.
Be cautious when handling the hot stone; use oven mitts for safety.
Step 6: Prepare the Sauce

In a saucepan, heat olive oil over medium heat and add minced garlic.
Sauté until fragrant, then add crushed tomatoes and oregano.
Simmer for about 10 minutes to allow the flavors to meld.
Taste and adjust seasoning as needed for a balanced sauce.
Step 7: Shape the Dough

Once the dough has risen, punch it down to release excess air.
Divide it into two equal portions for two pizzas.
On a floured surface, use your hands to gently stretch the dough into a round shape.
Aim for a thickness of about 1/4 inch for the best crust.
Step 8: Add Sauce and Toppings

Transfer the stretched dough onto a pizza peel dusted with flour.
Spread a thin layer of sauce over the dough, leaving a small border for the crust.
Sprinkle mozzarella cheese evenly and add your desired toppings.
Be careful not to overload the pizza to maintain a crispy texture.
Step 9: Bake the Pizza

Carefully slide the pizza onto the preheated pizza stone in the oven.
Bake for about 10-12 minutes, or until the crust is golden and cheese is bubbly.
Keep an eye on it to prevent burning, especially towards the end.
A well-baked pizza will have a slightly charred crust with melted cheese.
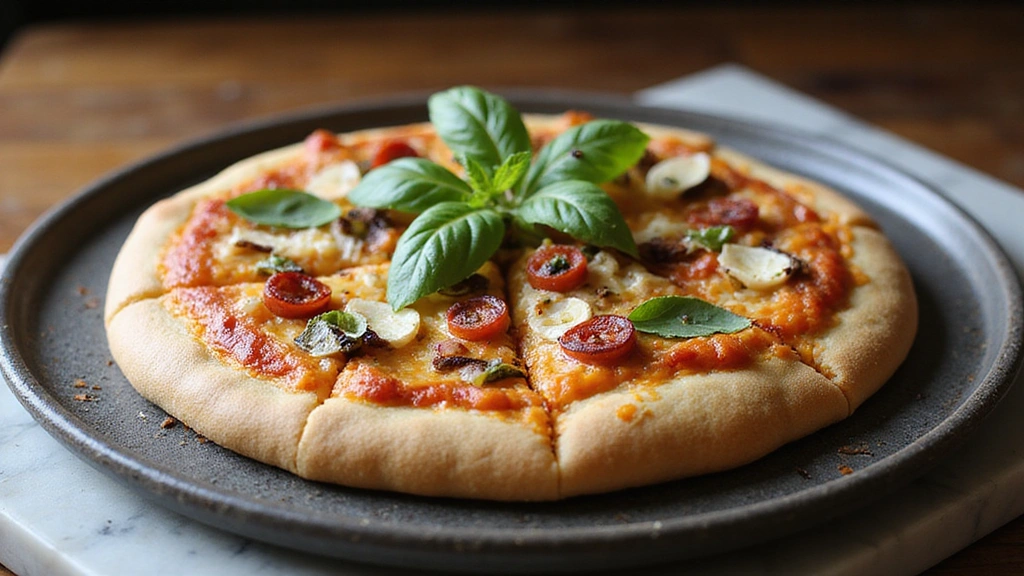
Step 10: Garnish and Serve

Once baked, remove the pizza from the oven using the peel.
Let it cool for a minute before slicing for easier handling.
Garnish with fresh basil leaves for a pop of color and flavor.
Serve hot and enjoy with your favorite beverage.
Critical Timing and Temperature Guide
Preheating the Oven: Preheat your oven for at least 30 minutes to ensure the stone reaches its optimal temperature of around 500°F. A hot stone is essential for achieving that perfect crust. Common mistake: Skipping preheating can lead to a soggy base.
Baking Time: Bake the pizza for 10-12 minutes, watching closely for doneness. The cheese should be bubbling and the crust golden brown. Common mistake: Opening the oven too often can cause temperature fluctuations.
Rising the Dough: Allow the dough to rise for about 1 hour until doubled in size. A longer rise can develop more flavor. Common mistake: Not allowing enough time for rising can result in dense dough.
Pro Tips for The Ultimate Guide To Pizza Stone Baking
• Ingredient Selection: Use high-protein bread flour instead of all-purpose flour for a chewier crust. Fresh mozzarella will provide better melt and flavor.
• Preparation Secret: Allow your dough to rest for 15-20 minutes after kneading. This relaxes the gluten, making it easier to shape.
• Temperature Management: Ensure your ingredients are at room temperature before mixing; cold water can stall yeast activation.
• Texture Enhancement: Experiment with a 2-step baking process—bake the crust alone for a few minutes before adding toppings for extra crispiness.
• Flavor Layering: Build flavors by adding herbs to the sauce and using a mix of cheeses for depth.
• Make-Ahead Strategies: Prepare and shape your dough a day in advance, then refrigerate it. Bring to room temperature before baking.
• Restaurant-Quality Finishing Touches: Drizzle a high-quality olive oil over the pizza just before serving for an added flavor boost.
• Equipment Optimization: Invest in a pizza stone that is thick enough to hold heat, reducing the risk of cracking.
Troubleshooting Common Issues
• Crust Too Soggy: This often occurs from too much sauce or toppings. To fix it, use a thinner layer of sauce and allow the dough to par-bake for a few minutes before adding toppings. Ensure the pizza stone is fully preheated.
• Crust Too Hard: This may happen if the dough is over-kneaded or baked too long. To remedy, shorten kneading time and check for doneness a couple of minutes earlier.
• Uneven Cooking: If one side of your pizza is cooked more than the other, it may be due to uneven heat distribution in the oven. Rotate your pizza halfway through baking for even cooking.
• Cheese Not Melting: Using pre-shredded cheese can lead to this issue due to added anti-caking agents. Opt for fresh cheese that melts beautifully.
• Burnt Toppings: If toppings burn before the crust is done, consider adding them halfway through the baking process. This allows the crust to cook without overcooking the toppings.
• Dough Not Rising: Ensure your yeast is active and that your dough is kept in a warm, draft-free area. If it doesn’t rise, try using new yeast and warm water.
Variations and Regional Differences
• Neapolitan Style: This version features a simple tomato sauce, fresh mozzarella, and basil, with a soft, chewy crust. The dough is traditionally hand-stretched and cooked in a wood-fired oven.
• New York Style: Known for its large, foldable slices, this pizza has a crisp crust that’s slightly thicker than Neapolitan but still chewy. It often includes a blend of mozzarella and provolone cheese.
• Chicago Deep Dish: This variant is baked in a deep pan and has a thick crust. It typically features cheese on the bottom, followed by toppings and sauce on top, creating a hearty meal.
• Modern Interpretations: Contemporary versions may include unique toppings like truffle oil or goat cheese, catering to dietary preferences and introducing fusion flavors.
Food Science Behind the Recipe
• Maillard Reaction: This chemical reaction occurs between amino acids and reducing sugars, giving the crust its golden-brown color and complex flavors during baking. Mastering this reaction helps achieve the perfect crust.
• Gluten Development: Kneading the dough activates gluten, which provides structure and chewiness. Understanding gluten helps you gauge how much to knead for the desired texture.
• Fermentation: Allowing the dough to rise enhances the flavor through fermentation, where yeast consumes sugars and produces carbon dioxide. This process not only leavens the dough but also develops its taste.
Frequently Asked Questions
What’s the most common mistake people make when preparing pizza? The most common mistake is not preheating the pizza stone long enough, leading to a soggy crust. Always allow at least 30 minutes for proper heating.
Can I prepare components of this dish in advance? Yes, you can prepare the dough a day ahead and refrigerate it. Just bring it to room temperature before shaping and baking.
How do I adapt this recipe for dietary restrictions? For a gluten-free pizza, substitute the all-purpose flour with a gluten-free blend. Ensure the yeast and other ingredients are also gluten-free.
What’s the best way to store and reheat leftovers? Store leftover pizza in an airtight container in the fridge for up to 3 days. Reheat in a skillet on low heat for the best crispiness.
Can I freeze this dish? Yes, freeze the unbaked pizza by wrapping it tightly in plastic wrap and then foil. Thaw it in the fridge before baking.
What wine or beverages pair best with this dish? A medium-bodied red wine like Chianti or a crisp lager pairs wonderfully, complementing the tomato and cheese flavors.
How can I scale this recipe up for a crowd? Double the ingredients for a larger batch, but keep in mind the oven capacity. Bake pizzas in batches if necessary.
What side dishes complement this recipe best? A simple arugula salad with lemon vinaigrette or garlic bread pairs excellently with pizza.
How do professional chefs elevate this dish for restaurant service? Professional chefs often use high-quality imported ingredients and may add unique finishing touches like fresh herbs or specialty oils.
Serving and Presentation Guide
• Traditional Presentation: Serve pizza on a wooden board, cutting it into wedges. Garnish with fresh basil or a drizzle of olive oil for an authentic touch.
• Modern Plating Ideas: Arrange slices on a slate platter with small bowls of dipping sauces for a contemporary twist. Use colorful toppings to enhance visual appeal.
• Accompaniment Suggestions: Pair with a fresh side salad, garlic knots, or antipasto for a complete meal experience.
• Special Occasion Presentation: For celebrations, consider a pizza buffet with various toppings and sauces, allowing guests to customize their slices for a fun, interactive dining experience.
Conclusion
With the right techniques and a pizza stone, you can elevate your homemade pizza to restaurant-quality.
I encourage you to gather your ingredients and give this method a try.
Every bite will remind you of the joy that comes from cooking and sharing food with loved ones.
Happy baking!


