
Baking bread at home is a delightful journey that connects us with our culinary heritage.
The aroma of freshly baked bread wafting through your kitchen is a sensory experience that warms the heart and fills the soul.
I’ve always loved the simple pleasure of breaking bread with family and friends, sharing stories over a loaf crafted with care.
With these Bigger Bolder Baking bread recipes, you’ll not only impress your loved ones, but you’ll also discover the joy of creating your own delicious breads from scratch.
The History and Cultural Significance
• Bigger Bolder Baking Bread Recipes You’ll Love traces its origins to ancient civilizations, where bread was a staple food for many cultures.
• The dish evolved over centuries, adapting to local ingredients and techniques, eventually leading to diverse variations across regions.
• In many cultures, bread is traditionally shared during significant occasions, symbolizing community and sustenance.
• While many variations exist, the authentic versions maintain key characteristics such as crusty exteriors and soft, airy interiors that set them apart from imitations.
Recipe Overview
Nutritional Information (per serving)
Ingredients
Essential Equipment Guide
Stand Mixer: A stand mixer with a dough hook is crucial for kneading bread dough thoroughly and evenly. If you don’t have one, you can knead by hand, but it requires more effort and time. Look for a mixer with at least 300 watts of power for optimal results.
Proofing Basket: This tool helps shape the dough while it rises and allows for beautiful patterns on the crust. If unavailable, a bowl lined with a floured towel can work as an alternative. Choose a basket that is the right size for your dough batch.
Baking Stone: A baking stone retains heat and mimics a traditional bread oven, providing a crispy crust. If you don’t have one, a preheated baking sheet can suffice. Ensure it’s thick enough to hold heat well.
Preparation Methods
Kneading: Kneading is essential for developing gluten, which gives bread its structure. Aim for about 10 minutes of kneading until the dough is smooth and elastic. To master this, use the heel of your hand to push the dough away and fold it back over.
Proofing: This step allows the dough to rise and develop flavor. It’s important to keep dough in a warm, draft-free environment, ideally around 75°F to 80°F. The dough should double in size, which usually takes about 1 hour.
Baking: Proper baking ensures a crispy crust and soft interior. Preheat your oven at least 30 minutes before baking to ensure even heat distribution. Look for a golden-brown color and a hollow sound when tapping the bottom.
Step 1: Prepare Ingredients

Gather all your ingredients on a clean, flat surface.
Measure out each component accurately to ensure proper ratios.
Having everything ready will streamline the process and make it more enjoyable.
Check the freshness of your yeast, as this affects the dough’s rise.
Step 2: Activate the Yeast

In a small bowl, combine warm water and sugar, then sprinkle the yeast on top.
Allow it to sit for about 5-10 minutes until it becomes frothy.
This step confirms that the yeast is alive and ready to leaven your bread.
If the mixture does not foam, your yeast may be inactive and should be replaced.
Step 3: Mix the Dough

In a large mixing bowl, combine flour and salt, then create a well in the center.
Pour in the activated yeast mixture and olive oil, mixing until a dough begins to form.
Use a wooden spoon or your hands to incorporate the flour gradually.
Ensure no dry flour remains at the bottom of the bowl.
Step 4: Knead the Dough

Transfer the dough onto a floured surface and begin kneading.
Push the dough away with the heel of your hand, fold it back towards you, and rotate it a quarter turn.
Continue this process for about 10 minutes until the dough is smooth and elastic.
If the dough is too sticky, sprinkle in a little more flour as needed.
Step 5: First Proof

Place the kneaded dough in a lightly oiled bowl, turning it to coat.
Cover the bowl with a damp cloth or plastic wrap to retain moisture.
Let the dough rise in a warm place for about 1 hour or until it doubles in size.
Check for a soft, puffy appearance as a sign that it’s ready.
Step 6: Shape the Dough

Once the dough has risen, gently punch it down to release excess air.
Turn it out onto a floured surface and divide it into desired portions.
Shape each piece into a loaf or round shape by tucking the edges underneath.
Ensure the surface is smooth for a professional look.
Step 7: Second Proof

Place the shaped dough into a greased loaf pan or proofing basket.
Cover it loosely again with a cloth and allow it to rise for another 30-45 minutes.
This second proofing helps develop flavor and texture.
Look for a slight puffiness that indicates it’s ready to bake.
Step 8: Preheat the Oven

While the dough is proofing, preheat your oven to 375°F (190°C).
This ensures the oven is hot enough to create a good rise and crust on the bread.
Position a baking stone or sheet in the oven during preheating for optimal heat retention.
A properly preheated oven is crucial for achieving the best crust.
Step 9: Bake the Bread

Once the dough has risen, place it in the preheated oven.
Bake for 25-30 minutes, or until the top is golden brown and sounds hollow when tapped.
If the bread starts browning too quickly, tent it with aluminum foil to prevent burning.
Use an instant-read thermometer to check for an internal temperature of 190°F for fully baked bread.
Step 10: Cool the Bread

Once baked, remove the bread from the oven and let it cool in the pan for 10 minutes.
Carefully turn it out onto a wire rack to cool completely.
Cooling on a rack prevents the bottom from becoming soggy and maintains a crisp crust.
Slice the bread only once it has cooled to allow the interior to set.
Critical Timing and Temperature Guide
Proofing: Allow dough to rise until doubled in size, typically 1 hour at room temperature. Look for a soft, puffy appearance. Avoid over-proofing, which can lead to collapse.
Baking: Bake at 375°F for 25-30 minutes. Doneness is indicated by a golden crust and a hollow sound when tapped. Common mistakes include underbaking, which results in a gummy texture.
Cooling: Cool bread for at least 10 minutes before slicing. Slicing too soon can cause the bread to appear gummy. Ensure it’s fully cooled on a wire rack.
Pro Tips for Bigger Bolder Baking Bread Recipes You’ll Love
• Ingredient Selection: Always use high-quality flour and fresh yeast for the best flavor and rise.
• Preparation Secret: Autolyse your flour and water for 20 minutes before adding yeast and salt to improve dough texture.
• Temperature Management: Ensure your water is not too hot (105°F to 115°F) to avoid killing the yeast.
• Texture Enhancement: Consider adding a tablespoon of vital wheat gluten for a chewier texture.
• Flavor Layering: Try incorporating herbs, cheese, or seeds into the dough for extra flavor.
• Make-Ahead Strategies: You can prepare the dough the night before and refrigerate it after the first proof for convenience.
• Restaurant-Quality Finishing Touches: Brush the top of the loaf with melted butter right after baking for a glossy finish.
• Equipment Optimization: Use a thermometer to ensure precision in both water temperature and oven heat.
Troubleshooting Common Issues
• Texture Too Dense: This often occurs from insufficient kneading or too much flour. Ensure you knead until smooth and elastic, and measure flour accurately.
• Flavors Unbalanced: If the bread tastes bland, increase salt slightly. Salt not only enhances flavor but also strengthens gluten structure.
• Overproofing: If the bread collapses during baking, it may have over-proofed. Pay attention to the dough’s volume and bake once it has doubled.
• Insufficient Rise: If the bread doesn’t rise enough, check the yeast’s freshness and ensure the dough is in a warm environment.
• Crust Too Hard: If the crust is too thick, reduce the baking time slightly or lower the oven temperature to allow for a gentler bake.
Variations and Regional Differences
• Italian Ciabatta: This version is known for its airy structure and crispy crust, often incorporating olive oil and a longer fermentation process.
• French Baguette: Characterized by its long shape and crusty exterior, this style utilizes a high-hydration dough and steam in the oven for extra crust.
• Irish Soda Bread: This quick bread relies on baking soda for leavening instead of yeast, resulting in a denser texture that’s perfect with butter.
• Modern Interpretations: Gluten-free variations can be made using almond flour or gluten-free blends, maintaining a focus on texture and flavor.
Food Science Behind the Recipe
• Gluten Development: Kneading develops gluten, which gives bread its structure and chew. Understanding how gluten forms helps in achieving the right dough texture.
• Yeast Fermentation: Yeast consumes sugars and produces carbon dioxide, causing the dough to rise. Familiarity with fermentation times can enhance flavor.
• Maillard Reaction: This chemical reaction occurs during baking, producing the golden-brown crust and rich flavors. Knowing how temperature affects this can help you perfect the crust.
Frequently Asked Questions
What’s the most common mistake people make when preparing bread? The most common mistake is not allowing enough time for the dough to rise, resulting in dense bread. Always look for the dough to double in size before baking.
Can I prepare components of this dish in advance? Yes, you can prepare the dough the night before and refrigerate it after the first rise. Just bring it back to room temperature before shaping.
How do I adapt this recipe for dietary restrictions? For gluten-free bread, substitute all-purpose flour with a gluten-free blend, and adjust the liquid as necessary.
What’s the best way to store and reheat leftovers? Store bread wrapped in plastic at room temperature for up to 3 days. To reheat, wrap in foil and place in a preheated oven at 350°F for about 10 minutes.
Can I freeze this dish? Yes, bread can be frozen for up to 3 months. Wrap it tightly in plastic wrap and then in foil to prevent freezer burn.
What wine or beverages pair best with this dish? A light white wine or a refreshing craft beer complements homemade bread beautifully.
How can I scale this recipe up for a crowd? To scale up, simply multiply the ingredients proportionally and ensure you have adequate space for proofing and baking.
What side dishes complement this recipe best? Soups, salads, or charcuterie boards make excellent pairings with freshly baked bread.
How do professional chefs elevate this dish for restaurant service? Chefs often enhance bread with gourmet toppings, artisan butters, or flavored oils for dipping, elevating the dining experience.
Serving and Presentation Guide
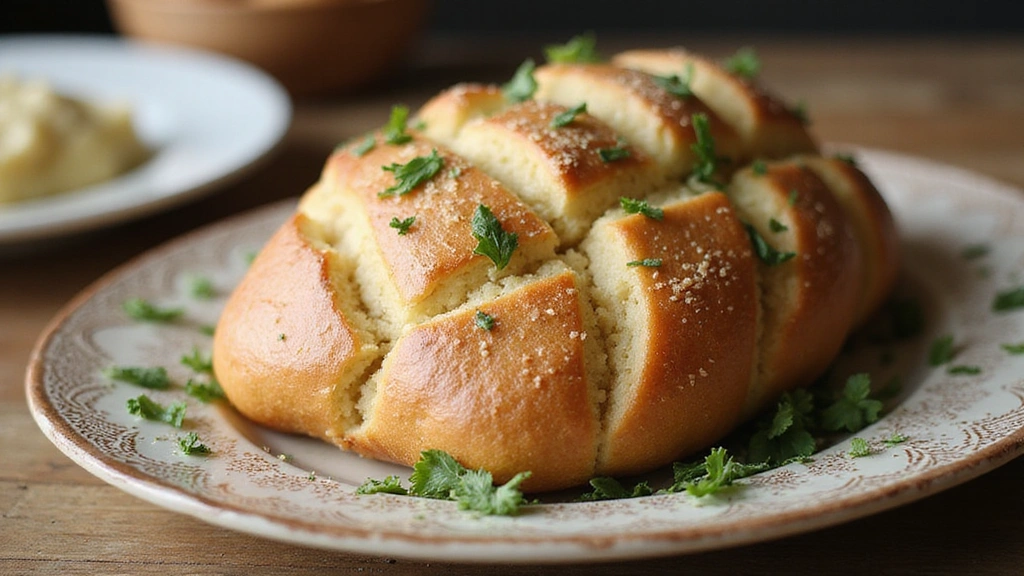
• Traditional Presentation: Serve the bread warm on a rustic wooden board, accompanied by a selection of butters or olive oils for dipping.
• Modern Plating Ideas: For a contemporary twist, slice the bread and arrange it on a sleek platter with colorful spreads and garnishes.
• Accompaniment Suggestions: Pair with a fresh salad, homemade soup, or a charcuterie board to create a delightful meal.
• Special Occasion Presentation: For celebrations, serve the bread in a decorative basket lined with cloth, adorned with fresh herbs or seasonal flowers.
Conclusion
Baking bread is not just about creating a meal; it’s about crafting memories that last a lifetime.
I encourage you to give this recipe a try, as the rewards are truly worth the effort.
With each loaf, you’ll discover not only the satisfaction of your handiwork but also the joy it brings to those you share it with.


